Sim Local eSIM Not Working? How to Fix Installation, Signal, and Data Problems
If your Sim Local eSIM is not working, start by leaving the installed profile in place. Many travel-eSIM problems involve settings, coverage, activation timing, or the remaining allowance. Deleting the profile can make those problems harder to solve.
Start with the six checks
The next step is to identify what has actually failed. A QR code that will not install is different from an installed line showing no signal. Signal bars with no internet point to another set of checks.
This tutorial follows that order, moving from simple checks to provider support. You do not need to change every setting at once or buy a replacement before understanding the problem.
Keep your order email nearby. Sim Local sells plans from several providers, so the correct activation details and APN depend on the product you purchased.
Start with These Six Checks
- Confirm that your exact phone supports eSIM and can use the purchased provider.
- Check whether the travel profile already appears in the phone's SIM settings.
- Make sure you are in a destination included in the selected package.
- Confirm that the travel line is enabled and selected for mobile data.
- Apply the travel plan's roaming instructions while keeping the home line's costs under control.
- Check the remaining data, expiry, and any activation requirement in the order details.
These checks separate the most common problem categories. If you change anything, make one adjustment at a time and test again. That makes it easier to understand which change helped.
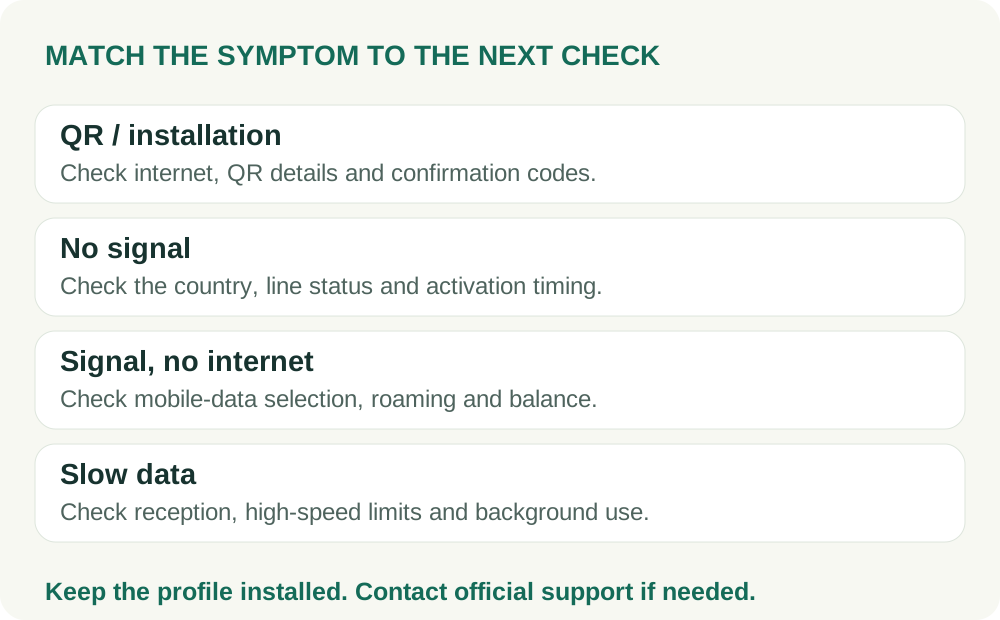
First, Identify the Symptom
The eSIM Will Not Install
The profile is not visible in your SIM list, and the phone rejects the download, QR code, or activation details. Focus on compatibility, lock status, the internet connection, and the installation credentials.
The eSIM Is Installed but Has No Signal
The travel line appears in settings but shows no service or continues searching. Focus on destination coverage, line status, activation, and supported-network registration.
The eSIM Has Signal but No Internet
The phone shows network reception, but webpages and apps do not load over mobile data. Check data-line selection, roaming, APN, balance, validity, and any device-level connection tools.
The Internet Works but Is Slow
This is a performance issue rather than a complete installation failure. Signal quality, congestion, high-speed limits, network mode, and background activity become more relevant.
1. Check Whether the eSIM Is Already Installed
On iPhone, open Settings and then Cellular, Mobile Data, or Mobile Service. Look under the SIMs or mobile-plan list for the new line.
On Samsung, open Settings, Connections, and SIM manager. On Pixel, look under Settings, Network & internet, and SIMs.
The profile may have a generic label such as Travel or Secondary. Compare the details with the order where possible instead of assuming an unfamiliar name belongs to an old plan.
If the profile is present, do not keep scanning the QR code. The installation credential may be intended for a one-time download, and the code may be rejected simply because it has already been used.
Rename the line clearly once identified. Knowing which profile belongs to the travel purchase makes every later check safer and easier.
2. If the QR Code Is Not Working
Use a Stable Connection
The phone needs working internet access to retrieve the profile. A Wi-Fi network that shows connected but still requires a portal login may not provide that access yet.
Open a normal webpage to confirm the connection works, then return to installation. If the network is unreliable, use another trusted connection rather than repeatedly restarting the same failed download.
Improve the Scan
Display the full QR code clearly on another screen and avoid cropping its edges. Increase screen brightness if the camera struggles to recognise it.
If the code is only on the same phone, use the supplied app installation or manual method. Trying to make the camera scan its own display is an unnecessary obstacle.
Check Additional Codes
Some Sim Local products, including selected Three plans, require a separate four-digit confirmation code. Find the relevant email and enter the eSIM-specific code when requested.
A missing confirmation step can stop the process even when the QR code itself is correct. Follow the full purchase instructions rather than a generic scanning guide alone.
Try the Provided Manual Method
If the profile is not already installed and the purchase includes manual activation details, use the phone's manual-entry option. Copy the values exactly, including the complete activation string if that is the format supplied.
Do not borrow activation details from another order or a public tutorial. They are credentials for a particular profile, not universal settings for the brand.
3. If You See “Unable to Activate” or “Code No Longer Valid”
Check the SIM list before interpreting the error. The profile may already have been installed, or an earlier attempt may have completed even though the final screen looked unclear.
If it is present, move on to the data and network settings. If it is absent, confirm the phone's compatibility, carrier-unlock status, and internet access before trying the supplied manual installation method.
An error can also relate to credentials that cannot be reused or a plan that needs support intervention. Repeatedly trying the same exhausted code will not create a new profile.
Contact Sim Local if the status remains unclear. Provide the exact message and explain whether the profile appears in settings. That distinction helps support choose the right next step.
4. If the Phone Is Stuck on Activating
Sim Local notes that activation can sometimes take up to ten minutes. Give the process time to finish while keeping the phone connected and the profile installed.
If you are still outside the covered destination, the line may be unable to register on its intended network yet. Read the plan's activation rules before treating that as a failure.
After waiting, a normal phone restart may help. Check the SIM list again rather than deleting the line because the status indicator has not changed.
If you are already in the correct destination and the problem persists, continue with the line-selection and roaming checks below. Activation timing is only one possible cause.
5. Confirm the Country Is Included
Open the exact package's coverage list. A provider offering plans for a country does not mean your particular regional or global purchase includes it.
This matters after border crossings and during stopovers. A UK package may not work in Ireland unless its roaming terms include Ireland, and a USA plan should not be assumed to work in Canada.
Also distinguish land-based coverage from connectivity at sea. A normal travel eSIM may work at a port and lose service once the ship moves offshore.
If the destination is not included, changing the APN will not add it. You need suitable coverage for that location rather than a different phone setting.
6. Select the Travel eSIM for Mobile Data
An installed line can be enabled without being the phone's chosen source of mobile data. Check that selection directly.
On iPhone, open the Cellular or Mobile Data settings and select the travel line for data. Review Allow Cellular Data Switching so the phone does not use another line unexpectedly.
On Samsung, choose the data SIM in SIM manager. On Pixel, open the SIM preferences under Network & internet and select the travel line for mobile data.
If the phone has automatic backup-data features, review those too. The aim is to test the travel plan deliberately, without accidentally using chargeable home roaming.
7. Check Data Roaming on the Travel Line
Many travel eSIMs need roaming enabled to use their partner networks. Follow the instructions supplied with the purchased plan and apply the setting to the travel line itself.
Do not turn on roaming indiscriminately for every SIM. The home line is billed separately, and its roaming settings should reflect the service you intend to use.
If you do not need the home line for calls or texts, you can leave it disabled while testing. If you keep it active, remember that disabling its data roaming does not automatically make ordinary calls or sent texts free.
After changing the setting, allow time for the phone to reconnect. Then test a lightweight webpage with Wi-Fi temporarily turned off.
8. Check the Data Balance and Expiry
Open the relevant plan-management page or operator account. Confirm both the remaining allowance and the time left on the package.
A connection can stop because the data is exhausted even when several days remain. It can also stop at expiry while unused data is still showing.
On an unlimited-labelled plan, reaching the daily high-speed threshold may reduce performance rather than remove the profile. Check the selected product's fair-use rules and reset information.
If a top-up is available, read what it adds and when it starts before purchasing. Some Sim Local products use operator-specific refill processes, and some require a new plan instead of an add-on.
9. Check the APN Only When Needed
The APN is part of the configuration that allows the mobile service to provide internet access. An incorrect value can leave the phone with signal but no usable data connection.
Many profiles configure this automatically, so do not change it simply because a generic guide recommends an APN. Use the value specified for the provider shown on your order.
Sim Local's portfolio includes different operators and travel products. There is no single APN that should be pasted into every Sim Local purchase.
On Android, the relevant options are often under the selected SIM's Mobile Network or Access Point Names settings. On iPhone, editable APN controls depend on the carrier configuration and may not be shown.
If the field is unavailable or the correct value is unclear, contact support. Changing unrelated mobile settings is unlikely to help and can make the original issue harder to diagnose.
10. Refresh the Network Connection
After confirming the basic settings, toggle airplane mode briefly, then turn it off and allow the phone to reconnect. A normal restart is another reasonable step.
Do not interrupt an active profile download to do this. Use the connection refresh after installation has completed and you are troubleshooting registration or data access.
If automatic network selection is failing, inspect the supported partners for the package. You can try manual selection of a supported network where the device allows it.
Seeing a network in the phone's list does not mean your plan can use it. Select a supported partner, wait for registration, and return to automatic selection if manual selection does not help.
11. If the Connection Is Slow
Move to a Better Reception Spot
Thick walls, basements, underground transport, and remote terrain can weaken the connection. Try a nearby open location or window before assuming the plan has failed.
Avoid moving somewhere unsafe simply to improve reception. The purpose is to compare reasonable nearby conditions, not chase a signal into an unsuitable location.
Check the Daily High-Speed Allowance
If performance became slower after substantial use, inspect the plan's fair-use threshold. Reduced speeds may be the expected behaviour after that threshold, rather than a fault in the phone.
Do not assume buying an unrelated add-on will restore full speed immediately. Check how the selected package handles refills and daily resets.
Pause Background Transfers
A large upload or a connected laptop can occupy the connection while other apps appear sluggish. Pause cloud backups, updates, and unnecessary downloads, then test again.
Use a small practical test rather than repeated speed tests. The aim is to establish whether messages and ordinary webpages work, not consume more of the allowance measuring it.
Compare Network Modes if Appropriate
If 5G reception is unstable, temporarily testing an available LTE or 4G mode can help identify a local radio issue. Restore your preferred automatic setting afterward if the change does not improve service.
A 5G label on the plan is not a guarantee that 5G will be available or fastest at every location. Stable reception is more useful than forcing a particular icon.
12. If Only One App or the Hotspot Fails
If normal webpages load but one app does not, the eSIM may be working correctly. Check that app's mobile-data permission, account status, and any service-specific restrictions.
A VPN, custom DNS service, or filtering tool can also affect access. If appropriate, briefly pause the relevant tool and test a non-sensitive page, then restore the setting. Do not assume every connection problem originates with the mobile plan.
For hotspot issues, first confirm that data works on the phone itself. Then check that the package allows tethering and that the second device is joining the correct hotspot with the correct password.
Look for large background transfers on the connected device. A laptop updating itself can make a working hotspot feel unusable for everything else.
If You Already Deleted the eSIM
Contact support before purchasing again. Most Sim Local operator profiles cannot simply be recovered or downloaded again after deletion.
Sim Local documents a limited Smartroam exception: manual reinstallation on the same device may be possible, while the original QR code will not work for that recovery. Its guidance also places restrictions on recovery for plans that have been topped up or extended.
If the purchase was unused and never activated, support can review the situation. That is not a guarantee of replacement, so explain what happened clearly and wait for the appropriate instructions.
Do not assume a similarly named newer product follows the Smartroam exception. Use the actual provider and purchase details to establish which rules apply.
How to Contact Support Effectively
Send a concise description of the problem with the order number, purchase email, phone model, software version, current country, and provider name. Include the exact error wording and whether the profile appears in settings.
Explain which checks you have already completed. For example: the travel line is selected for data, roaming follows the instructions, the package has an available balance, and the phone has been restarted.
Use screenshots only when they help, and share them through official support channels. Avoid posting the QR code, activation credentials, or personal account information publicly.
Sim Local support email: customerqueries@simlocal.com
Official help centre: https://simlocal.zendesk.com/hc/en-gb
Can You Request a Refund?
If the issue cannot be resolved, ask support about the applicable policy. Sim Local separates unused, unactivated change-of-mind requests within 14 days from technical failures attributable to its service or network.
A used, functioning plan is not automatically refundable because the trip has ended or you would prefer a different package. Keep the focus on the actual problem and the purchase's conditions.
Current policy: https://www.simlocal.com/support/refund-policy
Get the Connection Working Without Creating a Second Problem
Keep the profile installed, identify whether the issue involves installation, registration, or internet access, and work through the relevant checks in order. Change one thing at a time and test the travel line deliberately.
Most importantly, use the instructions for your actual package. The correct provider details are more useful than a generic fix copied from another eSIM brand.
If you need to revisit the original setup, follow our installation tutorial: Sim Local installation tutorial